Prugasti materijal nije komplikovan za rad, ali treba obratiti pažnju na simetriju leve i desne strane garderobe. Zbog toga, kada sečem materijal, sečem jedan po jedan sloj, odnosno jedan po jedan deo kroja. Najpre iskrojim jednu stranu prednjeg i zadnjeg dela nogavice, zatim isečene delove položim preko tkanine, poravnam sve pruge na oba sloja materijala, pričvrstim slojeve špenadlama i tek onda krojim donji sloj. Pri tom, treba voditi računa o tome da svaki krojni deo treba da ima po dva simetrična panela (dok sam bila neiskusnija, dešavalo mi se da iskrojim dva identična panela, pa dobijem dve leve ili desne nogavice).
Striped fabric isn't very difficult to work with, but one has to pay attention to the symmetry of the left and right garment's sides. That's why I always cut the fabric one layer at time. First I cut one side of both back and front legs, then I lay the cut pieces over the remaining fabric, align all the stripes on both layers, pin the layers together and then cut the lower layer of the fabric. Be careful when cutting, you need two symmetrical panels (when I was less experienced, I used to cut two identical panels, thus having two left or right legs).
Rešila sam da pojas pantalona naglasim ukoso postavljenim prugama. Kada ukoso krojim dezenirani materijal , uvek ga krojim sloj po sloj. Slično kao sa nogavicama pantalona, iskrojeni deo mi služi kao orijentir za sečenje drugog sloja tkanine.
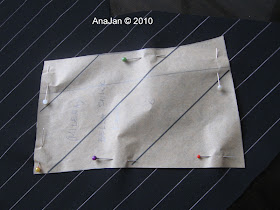
Na papirnom kroju prvo iscrtam par paralelnih linija, koje mi određuju pravac pruga na materijalu. Zatim jednu od nacrtanih linija poklapam sa prugama materijala.
I want to accentuate a waist of the pants by cutting it on bias. When I cut the patterned fabric on bias, I always cut it one layer at time. Just like when cutting pants legs, I use the cut piece as a cutting template for the second layer of fabric.
First I draw several parallel bias lines on the paper pattern. These lines will define direction of the fabric stripes. Then, when cutting the fabric, I align one of the drawn lines with the fabric stripe.
Na kraju, iskrojeni delovi izgledaju savršeno simetrično.
This way, the cut pieces look perfectly symmetric.
Kada želite da postavite pruge tako da formiraju šaru riblje kosti, potrebno je da pažljivo iskrojite susedne delove, koje ćete kasnije spajati.
If you want to arrange the fabric stripes in a herringbone style, you need to carefully cut the adjacent pieces, that you'll join together later.
Susedni delovi obično imaju isti oblik duž linija zajedničkog šava, što se vidi na slici ispod - preklopila sam krojne delove pojasa, naslanjajući naličje jednog na naličje drugog krojnog dela. Zatim sam na gornji krojni deo precrtala linije sa donjeg dela.
The adjacent pieces usually have identically shaped seam line along the side that they share. You can see it on the image below - I overlapped the pattern pieces, putting them with wrong sides together. Then I copied the bias lines from the lower pattern piece to the one laying above.
Kada vratite krojne delove u prvobitni položaj, videćete da iscrtane linije formiraju efekat riblje kosti.
When you put the pattern pieces back to the previous position, you can see that the drawn bias lines form the herringbone effect.
Zatim krojim novi krojni deo. Ovde je bitno da pruge materijala poklopite sa odgovarajućom linijom na krojnom delu - u mom slučaju, sa srednjom linijom.
Then I cut a new piece. It's essential to align the fabric stripe with the right bias line drawn on the paper pattern - in my case it's a line drawn in the middle.
Then I cut a new piece. It's essential to align the fabric stripe with the right bias line drawn on the paper pattern - in my case it's a line drawn in the middle.


Hvala ti Ana, tvoji saveti su tako praktični i logični! Ja sam uvek prugaste materijale krojila kao i sve ostale, iz duplog sloja, i sama sebi držala fige da se pruge nekim čudom poklope! Kako mi ovo nije palo na pamet?!
ReplyDelete