Jul 9, 2015

Tufnasta haljina sa čvorom


Dok sam šila ovu neobičnu haljinu za drugaricu, prošla sam kroz nekoliko faza i raspoloženja prema kroju. Da potsetim, u pitanju je kroj iz Burde 12/2012, #112. Prvo sam bila raspamećena njime, potom sam pomislila kako je čvor na stomaku loš detalj, koji dodaje volumen tamo gde bi ga trebalo izbegavati, a kada sam je konačno napravila divila sam se i haljini i sebi na izvedbi. Tada sam znala da želim da napravim i sebi isti model. 

Inicijalni plan je bio da iznova napravim test kroj, korigujem ga po svojim merama i građi, i zapravo odradim celu korekciju na isti način kao što sam je radila i za drugaricu. Međutim, kada sam izvadila kroj u svojoj veličini, shvatila sam da me mrzi da ponovo radim sve od nule, i rešila da malo rizikujem i skratim postupak. Zato sam prenela na svoj kroj iste korekcije koje sam napravila i na drugaricinoj haljini. Odabrala sam materijal iz svog šteka tkanina, a birala sam onaj za koji mi ne bi bilo žao da ga upropastim - sintetički saten sa elastinom, u teget boji sa bledoroze tufnicama.

Ja imam kraći torzo nego drugarica i generalno sam drugačije građena od nje, pa sam očekivala da bi kroj mogao imati dodatnih problema, i pored izmena. Kada sam probala haljinu, iznenadilo me je koliko je suknja delovala ravna i uža na meni spram toga kako isti model stoji drugarici. Skoro da sam bila razočarana. No, rešila sam da ne želim da bacim sav trud i materijal, pa sam blago modifikovala haljinu, tj. malo drugačije sam aranžirala nabore. Preklop koji se prema originalnom dizajnu uvija u čvor sam provukla kroz plastičnu kopču i prišila sa haljinu.

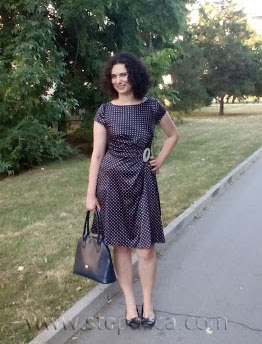
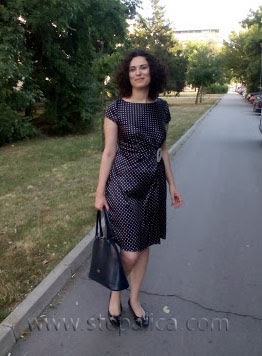
Na žalost, imam samo par slika u maloj rezoluciji da vam ilustrujem kako haljina izgleda na meni. Priznajem, nije tako lepa kao ona koju sam šila drugarici, ali je svakako slatka, i veoma je udobna.

Štepalica: Tufnasta haljina sa čvorom

Štepalica: Tufnasta haljina sa čvorom

Štepalica: Tufnasta haljina sa čvorom

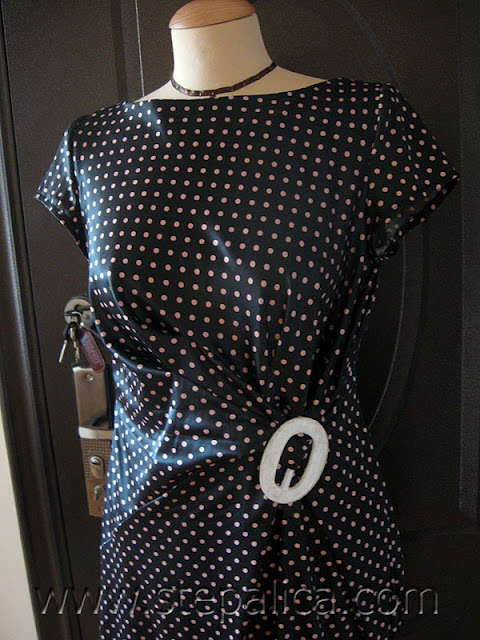
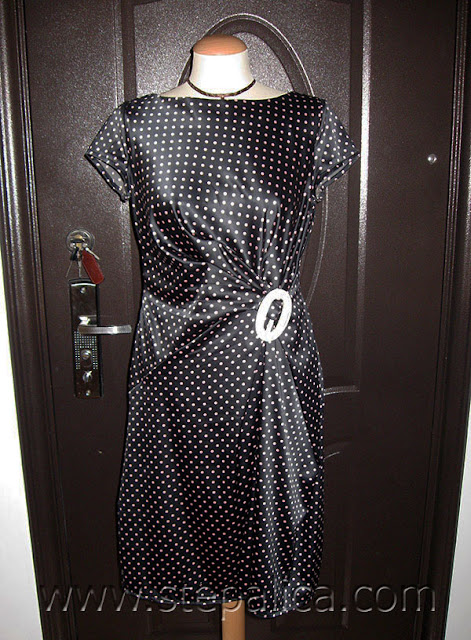
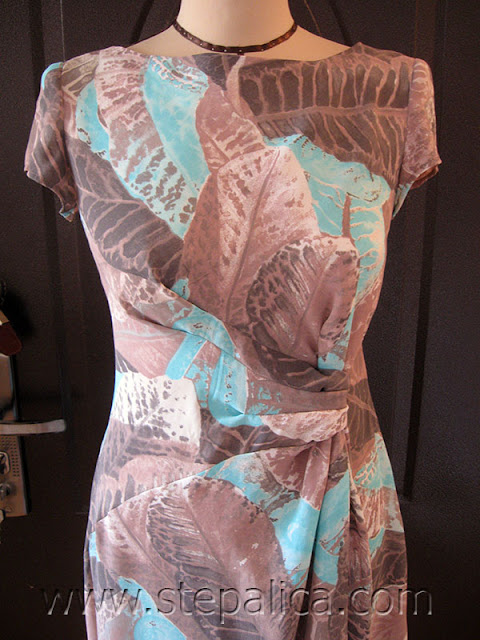
I evo par kvalitetnijih slika haljine na krojačkoj lutki.

Štepalica: Tufnasta haljina sa čvorom

Štepalica: Tufnasta haljina sa čvorom

Povezani tekstovi

Polkadots dress with a knot


While I was making this unusual dress for a friend, my thoughts towards it changed a lot. It is a pattern from Burdastyle 12/2012, #112. At first I loved the pattern, then I thought the knot detail was adding too much bulk to waist, and when I completed the dress I was thrilled with both the dress and my execution of it. That's when I realized I wanted to make one for myself.

My initial plan was to make a muslin first and fit the dress according to my measures and body shape. However, after I traced the pattern in my size, I realized I didn't feel like doing it all over again, so I decided to take a risk and cut down the process. So I copied the alterations I did for the friend's dress to my pattern. I chose a fabric from my stash - one that I wouldn't feel sorry for if I ruined it. It was navy stretch satin with pale pink polkadots.

I have a shorter torso torso than my friend and generally speaking, we have different body shapes, so I expected some issues with the pattern. When I tried on the dress I was surprised by how differently the same model looked on me and on the friend. On me, the skirt looked less voluminous and more straight. I was almost disappointed by the dress. However, I decided to make it work, so I arranged the dress'gathers differently, so that they suited my body better. The wrap that twists into a knot on the original dress was pulled through a buckle and sewed to the dress.

Unfortunately, I have only a few pics in low resolution to show you how the dress looks on me. I admit it, it's not as pretty as the one I made for the friend, but it's still very cute and very comfortable.

Stepalica: Polkadots dress with a knot

Stepalica: Polkadots dress with a knot

Stepalica: Polkadots dress with a knot

Here are some better pics of the dress on my mannequin.

Stepalica: Polkadots dress with a knot

Stepalica: Polkadots dress with a knot

Related posts


Post settings
Labels
#tutorial: how to alter a dress pattern BWOF-12/2012-112, dress
Published on
7/9/15, 7:00 AM

Central European Time

Permalink
Location
Search Description
Options

Jul 6, 2015

Haljina sa čvorom


Prošlo je skoro godinu dana od kako sam počela da radim na haljini za drugaricu. Da vas podsetim, u pitanju je veoma zanimljiv kroj sa čvorom, iz Burde 12/2012 #112. Prošlog jula smo napravile test kroj i pozamašno ga izmenile kako bi haljina dobila adekvatan oblik. Kroj je namenjen izuzetno visokim osobama, pa je kroj trebalo skratiti u predelu torzoa, o čemu sam pisala u ovom postu.

No, kroj sam naknadno još izmenila, dodavši par falti tamo gde ih nije bilo, i uklonivši par nabora tamo gde su pravili prevelik volumen. Trudile smo se da zadržimo originalan dizajn haljine, ali da je napravimo tako da svaki nabor stoji na svom mestu, ne dodajući volumen tamo gde to ne bi lepo izgledalo.

Da ne duljim previše priču, evo kako haljina izgleda. Koristile smo tanku viskozu, koja predivno pada.

Štepalica: Haljina sa čvorom

Štepalica: Haljina sa čvorom

Štepalica: Haljina sa čvorom

Štepalica: Haljina sa čvorom

Štepalica: Haljina sa čvorom

Detalj sa čvorom.

Štepalica: Haljina sa čvorom

Štepalica: Haljina sa čvorom

Štepalica: Haljina sa čvorom

Obrađivanje čvora je bio najteži deo šivenja haljine. Želela sam da haljina bude lepa, uredno sašivena, i praktična za održavanje. Zato sam odlučila da blago izmenim originalan kroj, i umesto da ručno prišijem preklop čvora za haljinu (kako uputstvo nalaže), ja sam ga provukla kroz prorez u šavu i drikerima pričvrstila za materijal.

Štepalica: Haljina sa čvorom

Štepalica: Haljina sa čvorom

Naličje haljine, detalj sa preklopom čvora.

Štepalica: Haljina sa čvorom

Štepalica: Haljina sa čvorom


Povezani tekstovi

The knotted dress


It's been alsmost a year since I started working on a dress for a friend. To remind you, we worked on a very interesting pattern with a knot detail from Burda Style 12/2012 #112. We made a muslin last July and altered the pattern quite a lot in order to make it fit. The pattern is drafted for extremely tall women, so we needed to shorten it, which I described in this post.

I altered the pattern more afterwards, by adding few more pleats and removing some of the unflattering gathers. We tried to keep the original design of the dress, while making it fit the body.

With no further ado, here is how the dress looks. We used a light viscose fabric that drapes beautifully.

Stepalica: The knotted dress

Stepalica: The knotted dress

Stepalica: The knotted dress

Stepalica: The knotted dress

Stepalica: The knotted dress

The knot details.

Stepalica: The knotted dress

Stepalica: The knotted dress

Stepalica: The knotted dress

Finishing the knot was the most difficult part of sewing. I wanted the dress to be neatly sewn, both from the right and wrong sides, while easy to maintain. So I decided to slightly alter original design - instead of sewing the knot wrap to the dress (as the sewing instructions said), I made a small slit in the waist seam and pulled the knot wrap through it. The wrap is fixed to the dress from the wrong side of dress with two snaps.

Stepalica: The knotted dress

Stepalica: The knotted dress

Stepalica: The knotted dress

Stepalica: The knotted dress

Related posts

Apr 20, 2015

Polica za peglanje, Burde i skener


Unazad par meseci bijem bitku sa prostorom u našem malom stanu. Posebno me muče Burde, kojih je sve više, a mesta sve manje, pa su raštrkane svuda unaokolo, praveći haos. Kada smo se pre tri godine uselili u ovaj stan, sa sobom sam ponela samo manji deo svoje kolekcije magazina sa krojevima - većina ih je ostala kod mojih roditelja, i stalno me nervira to što znam da brojne fenomenalne krojeve ne koristim jer mi nisu pri ruci. 

Neko vreme sam dumala o tome kako da rešim ovaj problem, i konačno shvatila da bi najbolje rešenje bilo da su časopisi u digitalnom formatu. To naravno znači da je kompletnu zalihu od otprilike 150 časopisa neophodno skenirati. Shvatih da bih u fotokopirnici platila ovu uslugu papreno skupo i da mi se više isplati da kupim skener i sama obavim posao. 

Đole je posebno oduševljena novom spravicom - ispostavilo se da je odlično mesto za dremku.

Štepalica: Skeniranje Burde

I tako je krenulo beskrajno skreniranje, stranu po stranu. Skeniram samo fotografije modela i krojne sveske, a preskačem članke na nemačkom, kao i reklame. Krojne listove ostavljam u originalnom papirnom formatu, a smeštam ih u registratore. Uz krojni list stavljam i naslovnu stranu časopisa, kako bih lakše prepoznala broj.

U jedan veći registrator uspem da stavim krojne listove iz 24 Burde, što će reći da dve godine Burdi zipujem na prostor koji je fizički otprilike šest puta manji. Rekla bih da je to značajna ušteda.

Štepalica: Burda krojni listovi

Svaki broj Burde konvertujem u PDF fajl, a paralelno pravim i fajl u koji smeštam samo preglede tehničkih crteža iz svih brojeva, sortirane po mesecima i godinama izdanja. Moram priznati da mi je mnogo lakše da pretražujem modele u digitalnom formatu, a krojni listovi su konačno uredno smešteni, i lako ih je ponaći.

Trenutno sam negde na trećini puta, skenirala sam 60ak brojeva, što znači da sam bila veoma vredna. Ne mogu da vam opišem koliko sam nestrpljiva da sredim svoju kolekciju magazina. Pride, dok skeniram Burde nalećem na fenomenalne krojeve koje želim da sašijem - neke nisam ranije zapazila, a nekih sam se potsetila, pa su ponovo dospeli na listu modela koje moram da napravim što pre.

Štepalica: Burda, tehnički crteži

No, i pored značajnog rasterećenja prostora, morala sam da rešim i problem skladištenja pomenutih registratora. U stanu koji je mali kao naš (ima svega 30 kvadrata), svaki kutak mora biti pametno iskorišćen, a najbolje je kada je svaki komad nameštaja multipraktičan. Tako ja reših da ćošak u kom držim dasku za peglanje, iskoristim do poslednjeg milimetra. Umesto klasičnih rasklopivih nogara, zamislila sam da daska stoji na polici u kojoj bih držala krojeve i ostalu krojačku literaturu koju imam. Naravno, policu smo rešili da pravimo po meri. Sami.

Štepalica: Polica za peglanje

Moj muž je projektovao, a ja sam asistirala, pa smo ovog vikenda sami sastavili policu za peglanje. Stavili smo velike točkiće kako bismo lako mogli da je pomeramo, ako se ukaže potreba. Budući da nam je ovo prvi stolarski poduhvat, prilično sam zadovoljna kako smo se snašli - iako nije savršena, mislim da je polica ispala odlična. Sad već smišljam nove komade nameštaja koje bih napravila za svoj krojački kutak.

I da vam dodatno ilustrujem odnos prostora koji zauzimaju časopisi naspram krojnih listova u registratoru - u jedan boks na polici stanu 24 Burde, isti broj Burdi (tj. krojnih listova) stane u jedan registrator.

Štepalica: Polica za peglanje

Kako vi čuvate svoje časopise s krojevima? Imate li neki sistem koji vam olakšava snalaženje i pretragu modela? Kolika je vaša zbirka magazina?

Povezani članci

Ironing board shelf, Burda magazines and a scanner


I've been having problems with insufficient space in our tiny apartment recently. Burda Style mags are specifically troublesome, as their number keeps increasing, while reducing the free space, so the mags are spread all around the apartment, making a true chaos. When we moved in three years ago I took with me only a minor portion of my sewing magazines collection, and left the majority at my parent's. These magazines are never used and I am annoyed by it as I know there are numerous fantastic patterns that just aren't reachable to me.

So I've been thinking for a while about how to fix this problem and finally came to a conclusion that having the patterns in a digital format would be a space saver. That of course meant I had to scan my collection of around 150 issues of sewing magazines. Having them scanned in a copyshop would too expensive, so I invested in a scanner / printer determined to do the hard-work myself.

As it appears, the scanner is a handy place for Djole to take a nap.

Stepalica: Scanning Burda Style magazines

So I started with an endless scanning of the magazines, page by page. I scan the photos of the models, and the workbooks, omitting the articles written in German (we import German issues of Burda and translate to Serbian only the workbooks), and the ads. I keep the pattern sheets in paper format and stack them into big folders. Along with each pattern sheet I put a cover page of the corresponding magazine, which makes it much easier to browse through the patterns.

One big folder can stack pattern sheets from 24 magazines, meaning that I can zip two years worth magazines into space that's six times smaller. I think that is a significant space saver.

Stepalica: Burda Style pattern sheets

Each magazine is saved to a PDF file, and I make an additional file that stores the technical drawings of all the models from all the magazines, sorted by months and years. This makes browsing through the patterns much easier for me, and the pattern sheets are finally well sorted and easy to reach.

I've completed approximately 1/3 of the job, as I scanned around 60 issues. I've been very busy! I can't explain how anxious I am to sort the whole collection of the magazines. While I've been scanning the pages, I noticed so many gorgeous patterns that I want to make as soon as possible. Some of those I haven't noticed before, but some are the ones I have been wanting to sew from the moment I saw them. 

Stepalica: Burda Style, technical drawings

Even though scanning reduced the space the mags were taking, I still had to find a place to store the folders with pattern sheers. When you live in an apartment as tiny as ours is (it has only 30 square meters ~ 323 square feet), each piece of furniture has to be multipractical. So I decided to use a tiny corner where my ironing board was. Instead of having an ironing board with foldable legs, I decided to make it an ironing shelf, where the board would be placed on top of a book shelf which would store all my sewing literature. The shelf had to be custom made. By ourselves (D. and myself).

Stepalica: Ironing board shelf

D. designed it and I assisted while constructing, so this weekend we made the ironing shelf. We put it on big wheels so that the shelf can be easily moved around if needed. Considering this is our first time doing carpentry, the shelf isn't perfect, but I am very pleased with how it turned out. I am already thinking of other pieces of furniture I would like to make for my sewing nook.

To illustrate the ratio between the space the magazines take compared to the folders: one box in the shelf can store 24 magazines, the same number of mags (or the pattern sheets) fits into a single folder.

Stepalica: Ironing board shelf

So, how do you store your sewing magazines? Do you have a special system that makes handling the patterns easier for you? How big is your collection of sewing magazines?

Related articles

Jan 29, 2015

A jacket with double lapels


Finally I have an actual garment to show you, as I have finally pushed myself to snap some pics of a new jacket that comes straight out of my sewing desk.

I've been collecting pics of jackets with some interesting details on Pinterest for a while. I love unusual lapels, collars, button closures, and all the details that make a garment stand out from everything else you see. I am frequently inspired by more than one details at the same time, and then I try to fit all these details into a single garment. In such case the art is to keep the things simple and not over-do a garment, so that at the end of the day it looks well styled and not costumey. Along with that I try to stay loyal to my personal style and make a garment that's pretty and comfy, and that I would wear gladly, The worst thing is when you invest a lot of time and effort into a garment you're not thrilled with.

Stepalica: A jacket with double lapels, inspiration
Left to tight: (1) unknown designer; (2) Alexander McQueen; (3) Haider Ackermann

This time I wanted to experiment with a double set of lapels. The idea came from the denim jacket (left on the picture) that I don't know who designed it. I loved the double set of lapels, as it's not a detail you can frequently see on clothes. However, I didn't want to make the jacket too casual, so I desiced to avoid using denim and twill. Leather sounded like a much better idea.

I also didn't want to use zipper, even though I normally like how it looks on jackets. But I have already made several jackets in a row which all feature zippers, so this time I wanted to make something different. So I thought of having a button closure with using metal frogs, like the one McQueen jacket had (in the middle on the picture). Along with the button closure, the McQueen jacket featured a gorgeous waist peplum that drew my attention. I didn't dare to make the peplum as voluminous as McQueen's is, but I did transfer some of its features to my jacket.

Finally, I wanted to add some eye catching detail to the back as well, so I added the folds to the back paplum resembling the ones I saw on Haider Ackerman's jacket (right on the picture).

You can see on the pictures below how the jacket turned out. I did'n make an exact copy paste of any of the details, but I did use the general ideas.

Stepalica: A jacket with double lapels

I used an artificial velour with a gorgeous weave, that can be easily mistaken for real leather suedue, as it looks and feels like one. I bought the fabric several years ago not having a clear idea of what I would use it for, so it sat down in the closet waiting for an inspiration. Since the fabric is woven, it is beautiful to work with - it can handle heat and ironing and it is not sensitive to needle penetration, so it was an easy job for me.

Stepalica: A jacket with double lapels

Stepalica: A jacket with double lapels

Stepalica: A jacket with double lapels

Stepalica: A jacket with double lapels

I really love the end result. I even think of copying the peplum detail on another jacket, and make it a bit more voluminous. We'll see what I'll think of meanwhile.

Related posts